Linear Regression in Swift with Tensorflow
Swift is a new programming language introduced by Apple in 2014. Despite being so young compared to other languages, it is already widely used in industry. It is mostly used to develop apps for Apple’s platforms. Recently however, after Apple making Swift open source, Swift was ported to linux and now Google is taking an interest in Swift by writing large parts of its deep learning library, TensorFlow, in Swift.
Swift, being the first programming language I learnt, has always been one of my favorite languages. Seeing it being used in deep learning is super exciting to me.
Today I will show you how to get started with Swift for TensorFlow by building a linear regression model using simple linear algebra operations on Swift tensors.
Getting started with Swift
I could try to introduce you to Swift, but it would not be as good as the following courses. If you don’t already know Swift, get started here.
- Hacking with Swift Chapter 0. This is a free book on iOS programming starting with an excellent guide to getting started with Swift
- The Swift Book. First introduced by Apple, and now part of the open source Swift project, this is the official book on getting started with Swift.
Creating a project
The easiest way to get started with Swift for TensorFlow is by using the empty Swift Google Colab Notebook. No installation required - you can just begin coding.
If you want to run Swift for TensorFlow locally, you can follow the excellent guide by Google in the Swift for TensorFlow GitHub repo.
Jeremy Howard, the founder and lecturer of fast.ai, has written an installation guide as well. You can find it here.
Coding!
Getting started
Assuming you are already familiar with linear regression and gradient descent, here is how I implemented it in Swift. Although there were a few things not working correctly (as can be expected for software at this stage), the process was super fun and exciting.
The matplotlib magic we commonly define at the top of the notebook, is available in Swift too. Using different syntax of course.
%include "EnableIPythonDisplay.swift"
IPythonDisplay.shell.enable_matplotlib("inline")
One of the nicest things about the Swift for TensorFlow ecosystem, is the integration with the “old” Python ecosystem. Python is just a framework available to use in Swift. This means that one can use Swift for every project he can do in Python right now!
import Python
import TensorFlow
Importing libraries using this API is a breeze:
let plt = Python.import("matplotlib.pyplot")
You can now call functions on the libraries that were imported. Note that you’ll very often need to set the data type of a variable to PythonObject in order to use it with the library.
Creating a dataset
Just like in Python TensorFlow, TensorFlow in Swift is based around Tensor structs. By using generics, the API for tensors is super “Swifty” (like “Pythonic” for Python) and clean in Swift.
This is how one could create a dataset to train a simple linear regression model on:
let a: Float = 2.0
let b: Float = 1.5
let x = Tensor<Float>(rangeFrom: 0, to: 1, stride: 0.01)
let noise = (Tensor<Float>(randomNormal: [100]) - 0.5) * 0.1
let y = (a * x + b) + noise
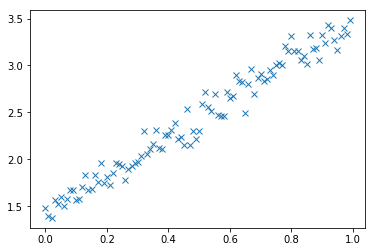
Plotting this data can be done in Swift using the Python integration. However, we can’t just input Swift tensors into matplotlib. First, we need to convert it to a numpy array so that matplotlib, having a Python API, can understand it.
plt.clf()
plt.plot(x.makeNumpyArray(), y.makeNumpyArray(), marker: "x")
plt.show()
The cost function
The cost function is very similar to Python as well. The major difference, converting types, is a result of Swift being a statically typed programming language (this is a very nice feature overall).
func cost(y: Tensor<Float>, predictions: Tensor<Float>) -> Float? {
  let m: Float = y.shape[0]
  let scalar = Tensor<Float>(Float(1.0) / (Float(2.0) * m))
  return Float(scalar * (y - predictions).squared().sum())
}
Initializing the model
Swift, just like Python, supports using greek characters as variable names.
var Θ = Tensor<Float>(randomNormal: [2, 1])
Adding a bias term to x is slightly less convenient than in NumPy because Swift for Tensorflow doesn’t support automatic broadcasting at this point. That means we have to add a empty dimensions ourselves for now.
let x_bias = Tensor<Float>(ones: [100, 1]).concatenated(with: x.reshaped(to: [100, 1]), alongAxis: 1)
Matrix multiplication in Swift uses the • symbol. This is a very interesting design decision from my point of view. It is unlike every other language, yet super clear.
Hint: use
ALT+8to enter “•”
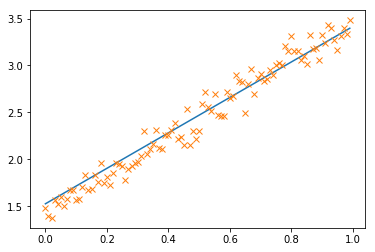
Training the model
Training the model is very similar to Python too. Note that Swift uses transposed instead of transpose which is a more “Swifty” way of writing.
let lr: Float = 0.01
let m = Float(y.shape[0])
for _ in 0...1500 {
  Θ -= (lr/m) * x_bias.transposed() • ((x_bias • Θ) - y.reshaped(to: [100, 1]))
}
Some thoughts on s4tf
Seeing Swift being used for machine learning is super exciting. While I really like Python, I also like the type safety, API design capabilities and many other features of Swift.
Writing Swift inside a Jupyter Notebook, I found that the compile time is definitely noticable. Where Python kernels are virtually instant, Swift kernels take a second to compile. Compilation has its pros as well: code runs much faster.
Multiplying a small matrix took only 0.12 ms in Swift while it took 835 ms in Python. An astonishing 6875 times faster!
Because of this, I think that Python will continue to be the language used by many data scientists for quick experimentations and small projects. Larger applications or production code might benefit from the speed advantage of using Swift. Providing a library and ecosystem that’s shared between the two languages is a very powerful aspect of TensorFlow.
I can’t wait to learn more about TensorFlow and use Swift for machine learning!
A huge thanks to Sam Miserendino for proofreading this post!
Thanks for reading
I hope this post was useful to you. If you have any questions or comments, feel free to reach out on Twitter or email me directly at rick_wierenga [at] icloud [dot] com.